TensorRT 활용해보기 (Pytorch example)
TensorRT를 막상 써보려니 뭔가 잘 정리되어 있는 내용들이 없어서 따로 업데이트 해보려고 한다.
우선 내가 자주 쓰는 framework는 pytorch지만 tensorflow에서 또한 사용을 해야하기 때문에 두 케이스 모두에 대해서 알아보려고 한다.
[pytorch]는 TRT
[tensorflow]는 TF-TRT
로 나뉜다고 한다
(pytorch에 대해서 먼저 tensorRT를 만들고 tensorflow를 나중에 적용해서 앞에만 TF가 붙은건가??)
Documentation은 아래와 같은 듯 보인다.
[TRT]
https://developer.nvidia.com/tensorrt#what-is
NVIDIA TensorRT
An SDK with an optimizer for high-performance deep learning inference.
developer.nvidia.com
[TRT] - pytorch
Torch-TensorRT — Torch-TensorRT master documentation
Shortcuts
pytorch.org
[TF-TRT]
https://docs.nvidia.com/deeplearning/frameworks/tf-trt-user-guide/index.html
Accelerating Inference In TF-TRT User Guide :: NVIDIA Deep Learning Frameworks Documentation
TensorRT stores weights and activations on GPUs. The size of each engine stored in the cache of TRTEngineOp is about the same as the size of weights. TensorRT allocates memory through TensorFlow allocators, therefore, all TensorFlow memory configurations a
docs.nvidia.com
[TF-TRT] - git
https://github.com/tensorflow/tensorrt
GitHub - tensorflow/tensorrt: TensorFlow/TensorRT integration
TensorFlow/TensorRT integration. Contribute to tensorflow/tensorrt development by creating an account on GitHub.
github.com
[Pytorch - TensorRT]
일단 아래 pytorch공식 사이트를 이용하여 TensorRT를 실행해보자
https://pytorch.org/TensorRT/tutorials/installation.html
Installation — Torch-TensorRT master documentation
Shortcuts
pytorch.org
나는 Docker환경에서 실험을 많이 사용하니 pytorch 전용 docker image를 새로 다운 받아 container를 생성하겠다.
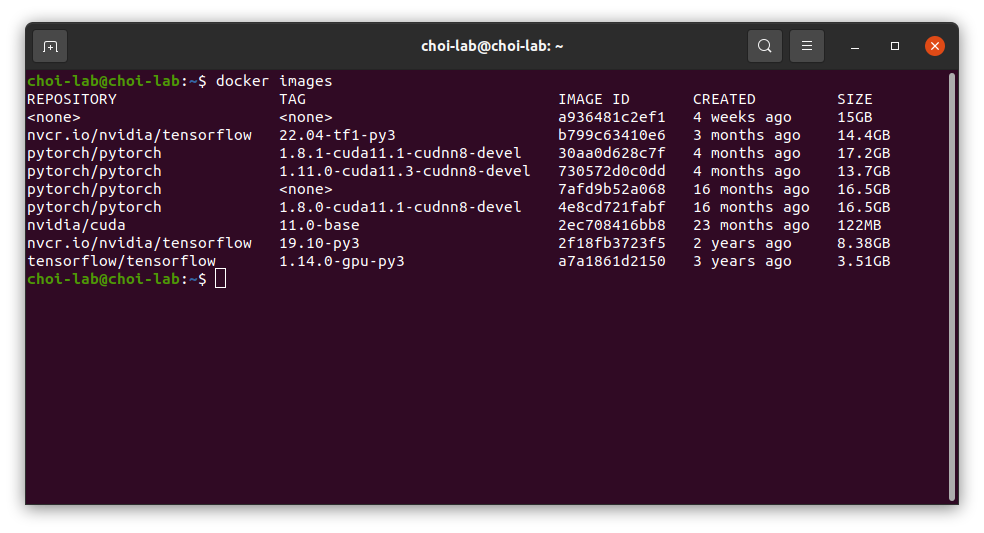
하려다가 귀찮아서 기존에 있는 docker images를 사용하여 container를 생성하겠다.
아래 명령어를 이용하여 docker container 생성
docker run -it --ulimit memlock=-1 --ulimit stack=67108864 -v $(pwd):/workspace --ipc=host --shm-size=32gb --name tensorRT --gpus=all pytorch/pytorch:1.11.0-cuda11.3-cudnn8-devel
Container 안에서 아래 명령어로 tensorRT 실행
pip3 install torch-tensorrt -f https://github.com/pytorch/TensorRT/releases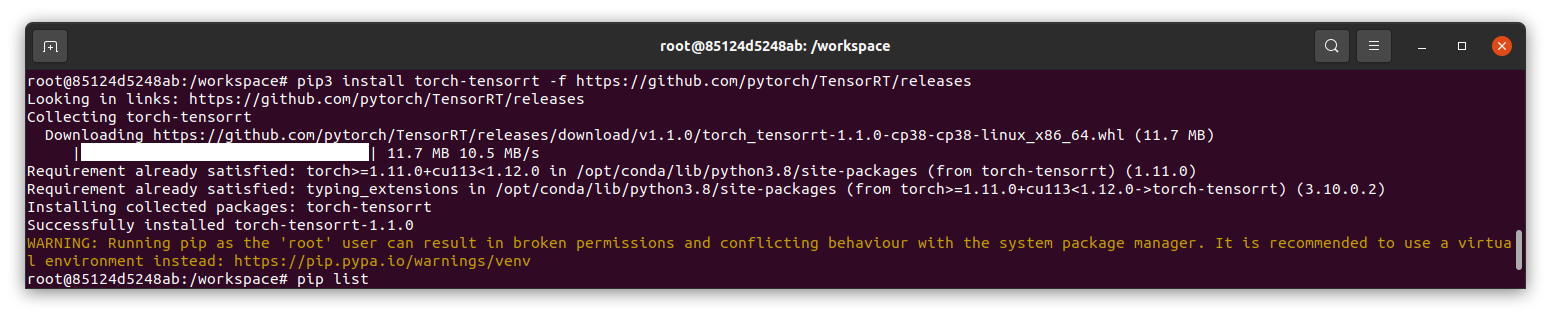
Jupyter notebook을 열어 아래 링크에 있는 코드를 실행시켰다.
https://pytorch.org/TensorRT/_notebooks/Resnet50-example.html
Torch-TensorRT Getting Started - ResNet 50 — Torch-TensorRT master documentation
Shortcuts
pytorch.org
!nvidia-smi!pip install ipywidgets --trusted-host pypi.org --trusted-host pypi.python.org --trusted-host=files.pythonhosted.orgimport torch
import torchvision
torch.hub._validate_not_a_forked_repo=lambda a,b,c: True
resnet50_model = torch.hub.load('pytorch/vision:v0.10.0', 'resnet50', pretrained=True)
resnet50_model.eval()!mkdir -p ./data
!wget -O ./data/img0.JPG "https://d17fnq9dkz9hgj.cloudfront.net/breed-uploads/2018/08/siberian-husky-detail.jpg?bust=1535566590&width=630"
!wget -O ./data/img1.JPG "https://www.hakaimagazine.com/wp-content/uploads/header-gulf-birds.jpg"
!wget -O ./data/img2.JPG "https://www.artis.nl/media/filer_public_thumbnails/filer_public/00/f1/00f1b6db-fbed-4fef-9ab0-84e944ff11f8/chimpansee_amber_r_1920x1080.jpg__1920x1080_q85_subject_location-923%2C365_subsampling-2.jpg"
!wget -O ./data/img3.JPG "https://www.familyhandyman.com/wp-content/uploads/2018/09/How-to-Avoid-Snakes-Slithering-Up-Your-Toilet-shutterstock_780480850.jpg"
!wget -O ./data/imagenet_class_index.json "https://s3.amazonaws.com/deep-learning-models/image-models/imagenet_class_index.json"from PIL import Image
from torchvision import transforms
import matplotlib.pyplot as plt
import json
fig, axes = plt.subplots(nrows=2, ncols=2)
for i in range(4):
img_path = './data/img%d.JPG'%i
img = Image.open(img_path)
preprocess = transforms.Compose([
transforms.Resize(256),
transforms.CenterCrop(224),
transforms.ToTensor(),
transforms.Normalize(mean=[0.485, 0.456, 0.406], std=[0.229, 0.224, 0.225]),
])
input_tensor = preprocess(img)
plt.subplot(2,2,i+1)
plt.imshow(img)
plt.axis('off')
# loading labels
with open("./data/imagenet_class_index.json") as json_file:
d = json.load(json_file)import numpy as np
import time
import torch.backends.cudnn as cudnn
cudnn.benchmark = True
def rn50_preprocess():
preprocess = transforms.Compose([
transforms.Resize(256),
transforms.CenterCrop(224),
transforms.ToTensor(),
transforms.Normalize(mean=[0.485, 0.456, 0.406], std=[0.229, 0.224, 0.225]),
])
return preprocess
# decode the results into ([predicted class, description], probability)
def predict(img_path, model):
img = Image.open(img_path)
preprocess = rn50_preprocess()
input_tensor = preprocess(img)
input_batch = input_tensor.unsqueeze(0) # create a mini-batch as expected by the model
# move the input and model to GPU for speed if available
if torch.cuda.is_available():
input_batch = input_batch.to('cuda')
model.to('cuda')
with torch.no_grad():
output = model(input_batch)
# Tensor of shape 1000, with confidence scores over Imagenet's 1000 classes
sm_output = torch.nn.functional.softmax(output[0], dim=0)
ind = torch.argmax(sm_output)
return d[str(ind.item())], sm_output[ind] #([predicted class, description], probability)
def benchmark(model, input_shape=(1024, 1, 224, 224), dtype='fp32', nwarmup=50, nruns=10000):
input_data = torch.randn(input_shape)
input_data = input_data.to("cuda")
if dtype=='fp16':
input_data = input_data.half()
print("Warm up ...")
with torch.no_grad():
for _ in range(nwarmup):
features = model(input_data)
torch.cuda.synchronize()
print("Start timing ...")
timings = []
with torch.no_grad():
for i in range(1, nruns+1):
start_time = time.time()
features = model(input_data)
torch.cuda.synchronize()
end_time = time.time()
timings.append(end_time - start_time)
if i%10==0:
print('Iteration %d/%d, ave batch time %.2f ms'%(i, nruns, np.mean(timings)*1000))
print("Input shape:", input_data.size())
print("Output features size:", features.size())
print('Average batch time: %.2f ms'%(np.mean(timings)*1000))for i in range(4):
img_path = './data/img%d.JPG'%i
img = Image.open(img_path)
pred, prob = predict(img_path, resnet50_model)
print('{} - Predicted: {}, Probablility: {}'.format(img_path, pred, prob))
plt.subplot(2,2,i+1)
plt.imshow(img);
plt.axis('off');
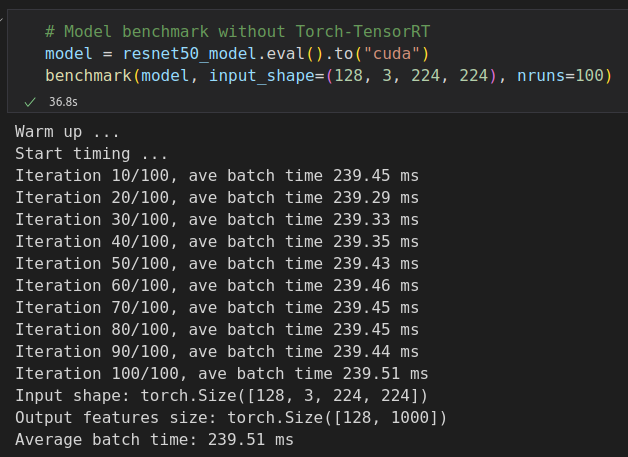
plt.title(pred[1])# Model benchmark without Torch-TensorRT
model = resnet50_model.eval().to("cuda")
benchmark(model, input_shape=(128, 3, 224, 224), nruns=100)
실행 도중 아래의 코드에서 import error가 발생했다.
import torch_tensorrt

# The compiled module will have precision as specified by "op_precision".
# Here, it will have FP32 precision.
trt_model_fp32 = torch_tensorrt.compile(model, inputs = [torch_tensorrt.Input((128, 3, 224, 224), dtype=torch.float32)],
    enabled_precisions = torch.float32, # Run with FP32
    workspace_size = 1 << 22
)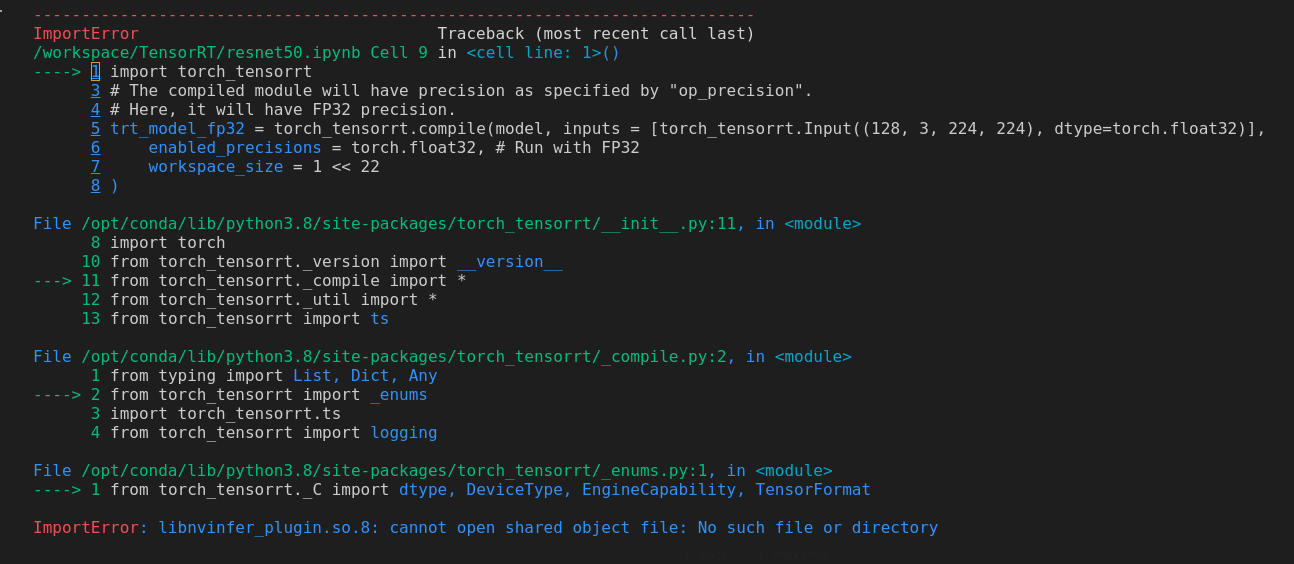
libnvinfer_plugin.so.8: cannot open shared object file: No such file or directory위와 같은 에러가 발생하였다.
full name으로 에러 검색을 조금 하다가 마땅한 해결책이 안나와서 libnvinfer로 검색하니 바로 아래 document가 보였다.
https://docs.nvidia.com/deeplearning/tensorrt/install-guide/index.html
Installation Guide :: NVIDIA Deep Learning TensorRT Documentation
These upgrade instructions are for Ubuntu and Windows users only. When upgrading from TensorRT 8.0.x to TensorRT 8.4.x, ensure you are familiar with the following. About this task Using a Debian file The Debian packages are designed to upgrade your develop
docs.nvidia.com
여길 보니 아래와 같이 따로 설치해주라고 되어 있어 아래 명령어를 이용하여 docker container에 설치를 해줬다.
sudo apt-get install python3-libnvinfer-dev
이후 에러났던 block을 다시 실행해주고 추가적으로 아래 명령어를 실행해주니 잘 작동하였다.
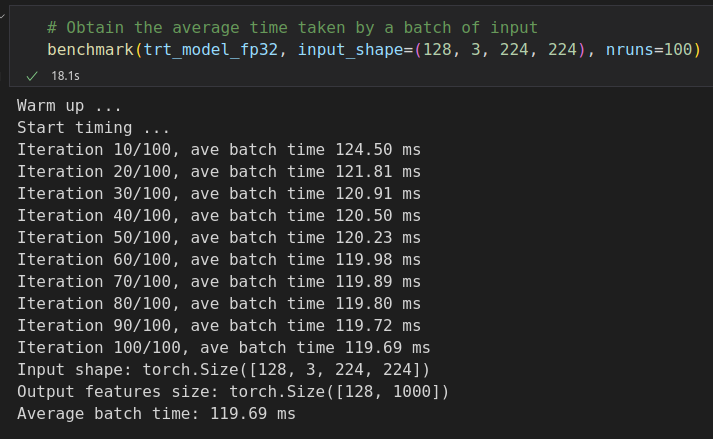
# Obtain the average time taken by a batch of input
benchmark(trt_model_fp32, input_shape=(128, 3, 224, 224), nruns=100)
아래는 rtx 3060에서 실험한 결과
첫 번째는 TensorRT를 사용하지 않을 때고, 두 번째는 TensorRT를 사용했을 때의 결과